


Guildrun Beginner Guide to Placement and Class Breaking
Why a healer can end a run as your best tank, how placement still decides fights you cannot control, what Rush and Stall keywords actually change, and how rank choices quietly rewrite every unit you own.
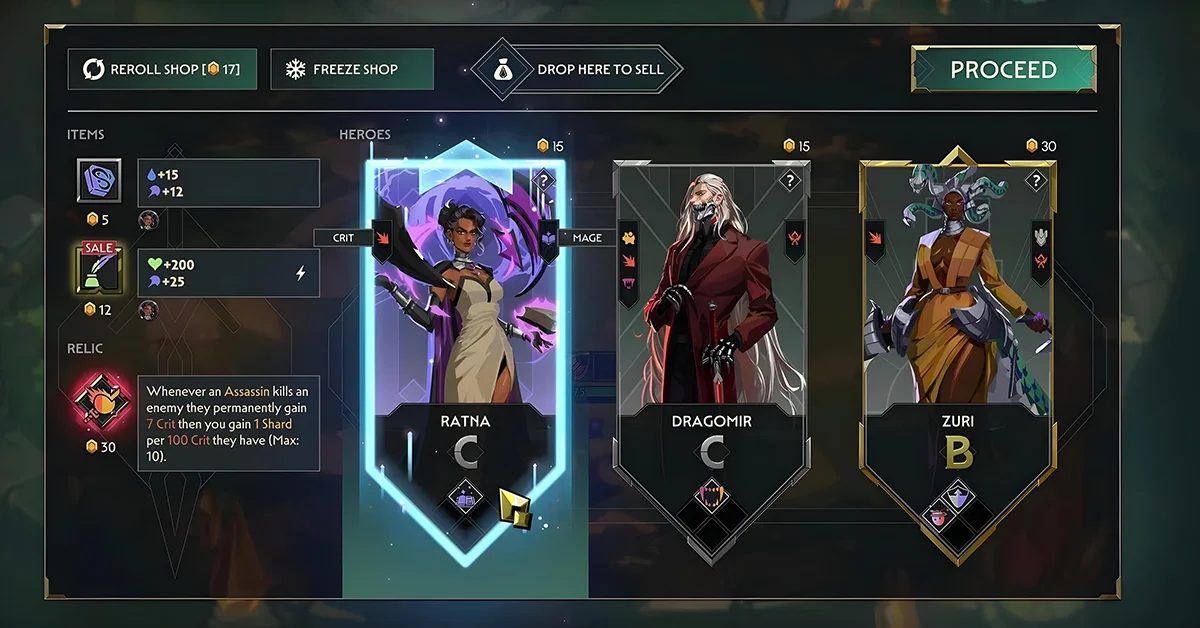
The single idea that separates Guildrun from most autobattlers is that starting class labels mean almost nothing. Healers can tank, ranged units can fight in melee, and a specialization choice at rank-up can turn a defensive unit into a damage hybrid without warning. Players who trust the portrait instead of reading the specialization text lose runs and blame variance. What follows covers class breaking, how placement works when combat resolves itself, the keyword timing system, rank progression, Shard decisions, and how to plan a first session.
What Is Guildrun and What Does the Demo Include?
Guildrun is a roguelike autobattler from Leyline, an independent studio whose lead designers carry Hearthstone and The Bazaar credits, alongside team members formerly at Blizzard, Riot Games, Konami, and Electronic Arts. That pedigree shows in how much of the game lives in tooltip text rather than mechanical execution.
The free Steam demo launched on 16 July 2026 and drew strongly positive reception quickly. It currently offers 25 heroes, 180 specializations, more than 300 relics, and over 100 items, with the full paid release targeted for late 2026. Downloading the demo costs nothing, and unlock progress carries forward: heroes, relics, and items open up as you complete runs, so even a failed run expands the pool available to your account.
The structural difference from competitive autobattlers matters for new players. There is no matchmaking queue and no combat timer, so you can think as long as you want and save mid-run. Official pacing suggests roughly twenty-minute runs at normal difficulty, though higher difficulties and Endless mode stretch sessions considerably once you understand the systems.
Why Do Class Labels Mislead New Players?
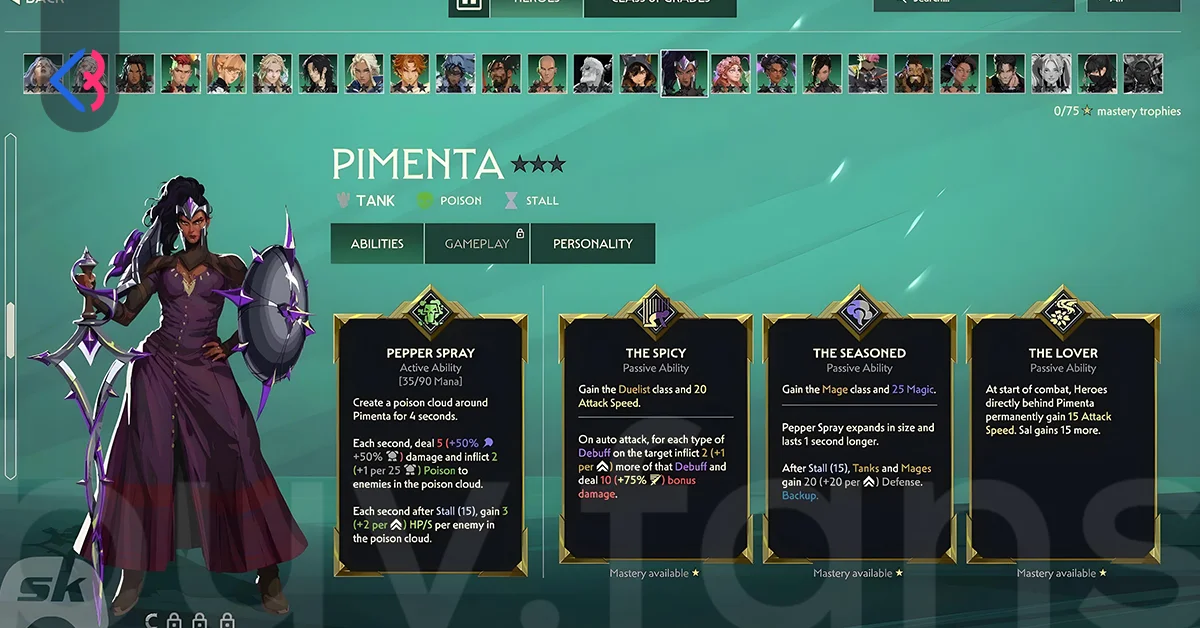
The heaviest trap in Guildrun is treating a unit's starting class as its destiny. The design leans deliberately into class breaking: healers can become tanks, ranged units can move into melee, certain units pair up to scale together, and multiclass boards can share execute effects or other team-wide bonuses.
The practical consequence shows up in the front line. A tank whose specialization path turned them into a damage hybrid will keep dying first every fight, and without defensive items that collapse looks exactly like bad luck. It is not luck; it is a rank choice made without reading the text. Slowing down for the first dozen specialization decisions is the fastest way to understand why fights go wrong, because that is where Guildrun hides its class-breaking fantasy.
With 180 specializations in the demo alone, the same hero can fill completely different roles across runs. Rather than deciding what a unit is when you buy it, decide what it becomes at each rank-up based on what your board currently lacks. A board missing a front line has a tank hiding inside whatever unit you rank next, provided you choose the right branch and back it with survivability items.
How Does Placement Matter When Combat Is Automatic?
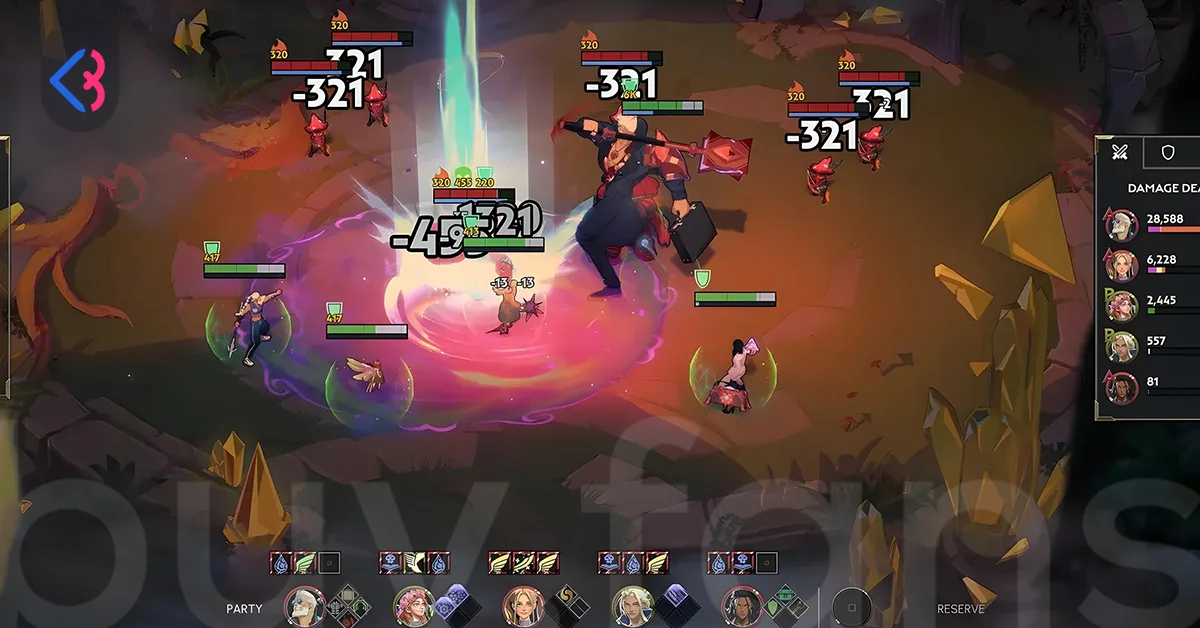
Combat resolves on its own after placement, so there is no in-fight decision to make. That does not make placement cosmetic. Your job is positioning, class mix, deciding who carries which items, and shaping the timing profile of your abilities.
Positioning affects damage patterns directly. Clumped backline units share area effects and can evaporate together, while isolated carries sometimes dodge specific patterns entirely. Treat the board as a puzzle you solve with the roster you actually own this run, not the one you wish the shop had offered. The right answer changes every run because the pieces change every run.
The combat interface tells you what happened. Damage meters and health bars on the right show who carried the fight and who contributed nothing. After a loss, open the meter before restarting; identifying the unit that did nothing tells you whether the fix is items, ranks, a Reserve Backup, or a full pivot. Fights are tests of the previous shop, not arenas where mechanical skill rescues a bad draft.
What Do Rush, Stall, and Backup Actually Change?
Keywords carry more weight than raw stats in Guildrun, and three of them define the shape of a fight. Rush abilities fire early, Stall abilities hold for later windows, and Backup effects apply even from the Reserve.
Stacking a board entirely with one profile creates a predictable failure. An all-Rush team explodes early and fades as the fight continues; an all-Stall team melts before its payoff window arrives. Distributing timing across the board matters more than owning the single strongest unit, because a fight you lose in the first ten seconds never reaches the abilities you paid for.
Backup is the keyword most new players ignore entirely. Because Backup effects apply from Reserve, your sixth and seventh ideas still contribute, which means leaving Reserve slots empty wastes value you already own. When buying a unit, weigh what it adds from the bench as seriously as whether it fits on the field. Reserve also softens pivots: instead of selling every piece of an abandoned plan, keeping the ones with useful Backup effects smooths the transition into a new build.
How Should You Spend Shards Early?
Shards are the run currency, earned between rounds and sometimes during combat, then spent on heroes, items, relics, and rerolls. Over-saving early is the most common new-player mistake, because an empty shop you declined to reroll leaves you with a dead board heading into the next fight.
A few heuristics keep spending decisions simple:
- Reroll whenever the shop offers nothing that advances your board plan.
- Buy the A-rank shop hero if they fill a missing role, even when you already have a pet unit you like more.
- Keep enough Shards to contest act-end auctions, which sell stronger pieces than normal shops.
The underlying logic is situational rather than numerical. If the next node is a fight and two shop slots patch real holes, buy them. If the next node is an auction and your board already clears the previous elite cleanly, bank instead. Those heuristics break the moment you pick up an economy relic that pays you for spending, so re-read economy relics immediately when they enter your build.
Trial events complicate this by offering mutually exclusive rewards, typically Shards against a named item against a relic. Take whichever reward fixes your current failure mode. If you are dying, survivability or sustain beats a greedy damage relic every time, no matter how strong that relic reads in isolation.
When Should You Sell and Rebuild?
Never selling is the third major trap, and it ends more runs than any single bad purchase. Guildrun actively rewards pivots when a relic asks for mono-class, rainbow-class, burn stacks, or attack-count thresholds, which means the build you started is rarely the build that should finish.
Timing the pivot comes down to evidence rather than instinct. When a carry sits near the bottom of the damage meter across two consecutive fights and neither ranking them up nor handing them items changes that, the unit has stopped being a plan and started being dead weight. Redirecting those Shards into a newly available A-rank hero usually returns more than one more attempt at rescuing the original carry.
Emotional attachment to a unit you invested in early is the quiet killer here. The investment is already spent, and holding a unit because of what it cost rather than what it currently does is exactly the reasoning Guildrun punishes. Practicing one deliberate pivot in an early run, selling a stalled carry and rebuilding around a late shop hero, teaches the skill faster than any amount of reading.






What Should Your First Session Look Like?
Aim for a full easy clear without overthinking the board. The first run should teach you the shop interface, the trial reward panels, and the party and reserve bar rather than produce a perfect composition. Treat that first clear as a tutorial for systems and unlocks, since later difficulties and Endless mode are where leaderboard ambition belongs.
After clearing once, restart and force one deliberate pivot. Add two smaller goals alongside it: read one relic carefully from start to finish, and use a Reserve Backup at least once on purpose. Those four objectives cover the systems that decide most runs, and hitting them matters more than how quickly you finish.
Prior autobattler experience helps but is not required. Familiarity with Teamfight Tactics-style placement or Slay the Spire-style relics makes the systems feel immediately recognizable, though the demo teaches the loop on its own. Reading keyword tooltips carefully carries far more weight than any ladder rank from another game, because Guildrun's difficulty ladder runs eight tiers deep and each step assumes you understood the text on the previous one.
This article was last updated on 16 October 2026 friday. Today, 51 visitors read this article.